Developer Quickstart
The Quorum Developer Quickstart uses the Hyperledger Besu Docker image to run a private IBFT 2.0 network of Besu nodes managed by Docker Compose.
This tutorial runs a private network suitable for education or demonstration purposes and is not intended for running production networks.
Prerequisites
- One of the following operating systems:
- Linux on x86_64 architecture
- macOS on an Intel processor (M1 processor not supported yet)
- Windows 64-bit edition, with:
- Windows Subsystem for Linux 2
- Docker desktop configured to use the WSL2-based engine
- Docker and Docker Compose
- Node.js version 12 or higher
- Truffle
- cURL command line
- MetaMask
Allow Docker up to 4G of memory or 6G if running the privacy examples. Refer to the Resources section in Docker for Mac and Docker Desktop for details.
Generate the tutorial blockchain configuration files
To create the tutorial docker-compose files and artifacts, run:
npx quorum-dev-quickstart
Follow the prompts displayed to run Hyperledger Besu and logging with ELK. Enter n for Codefi Orchestrate and private transactions.
If you enter y for private transactions, you get three Besu nodes with corresponding Tessera nodes for privacy. You can follow the privacy walk-through, which details how to send private transactions and interact with deployed private contracts.
Start the network
To start the network, go to the installation directory (quorum-test-network if you used the default value) and run:
./run.sh
The script builds the Docker images, and runs the Docker containers.
Four Besu IBFT 2.0 validator nodes and a non-validator node are created to simulate a base network.
When execution is successfully finished, the process lists the available services:
*************************************
Quorum Dev Quickstart
*************************************
----------------------------------
List endpoints and services
----------------------------------
JSON-RPC HTTP service endpoint      : http://localhost:8545
JSON-RPC WebSocket service endpoint : ws://localhost:8546
Web block explorer address          : http://localhost:25000/
Prometheus address                  : http://localhost:9090/graph
Grafana address                     : http://localhost:3000/d/XE4V0WGZz/besu-overview?orgId=1&refresh=10s&from=now-30m&to=now&var-system=All
Kibana logs address                 : http://localhost:5601/app/kibana#/discover
Collated logs using Grafana Loki    : http://localhost:3000/d/Ak6eXLsPxFemKYKEXfcH/quorum-logs-loki?orgId=1&var-app=besu&var-search=

For more information on the endpoints and services, refer to README.md in the installation directory.
****************************************************************
- Use the JSON-RPC HTTP service endpoint to access the RPC node service from your dapp or from cryptocurrency wallets such as MetaMask.
- Use the JSON-RPC WebSocket service endpoint to access the Web socket node service from your dapp.
- Use the Web block explorer address to display the block explorer Web application.
- Use the Prometheus address to access the Prometheus dashboard. Read more about metrics.
- Use the Grafana address to access the Grafana dashboard. Read more about metrics.
- Use the Kibana logs address to access the logs in Kibana. Read more about log management.
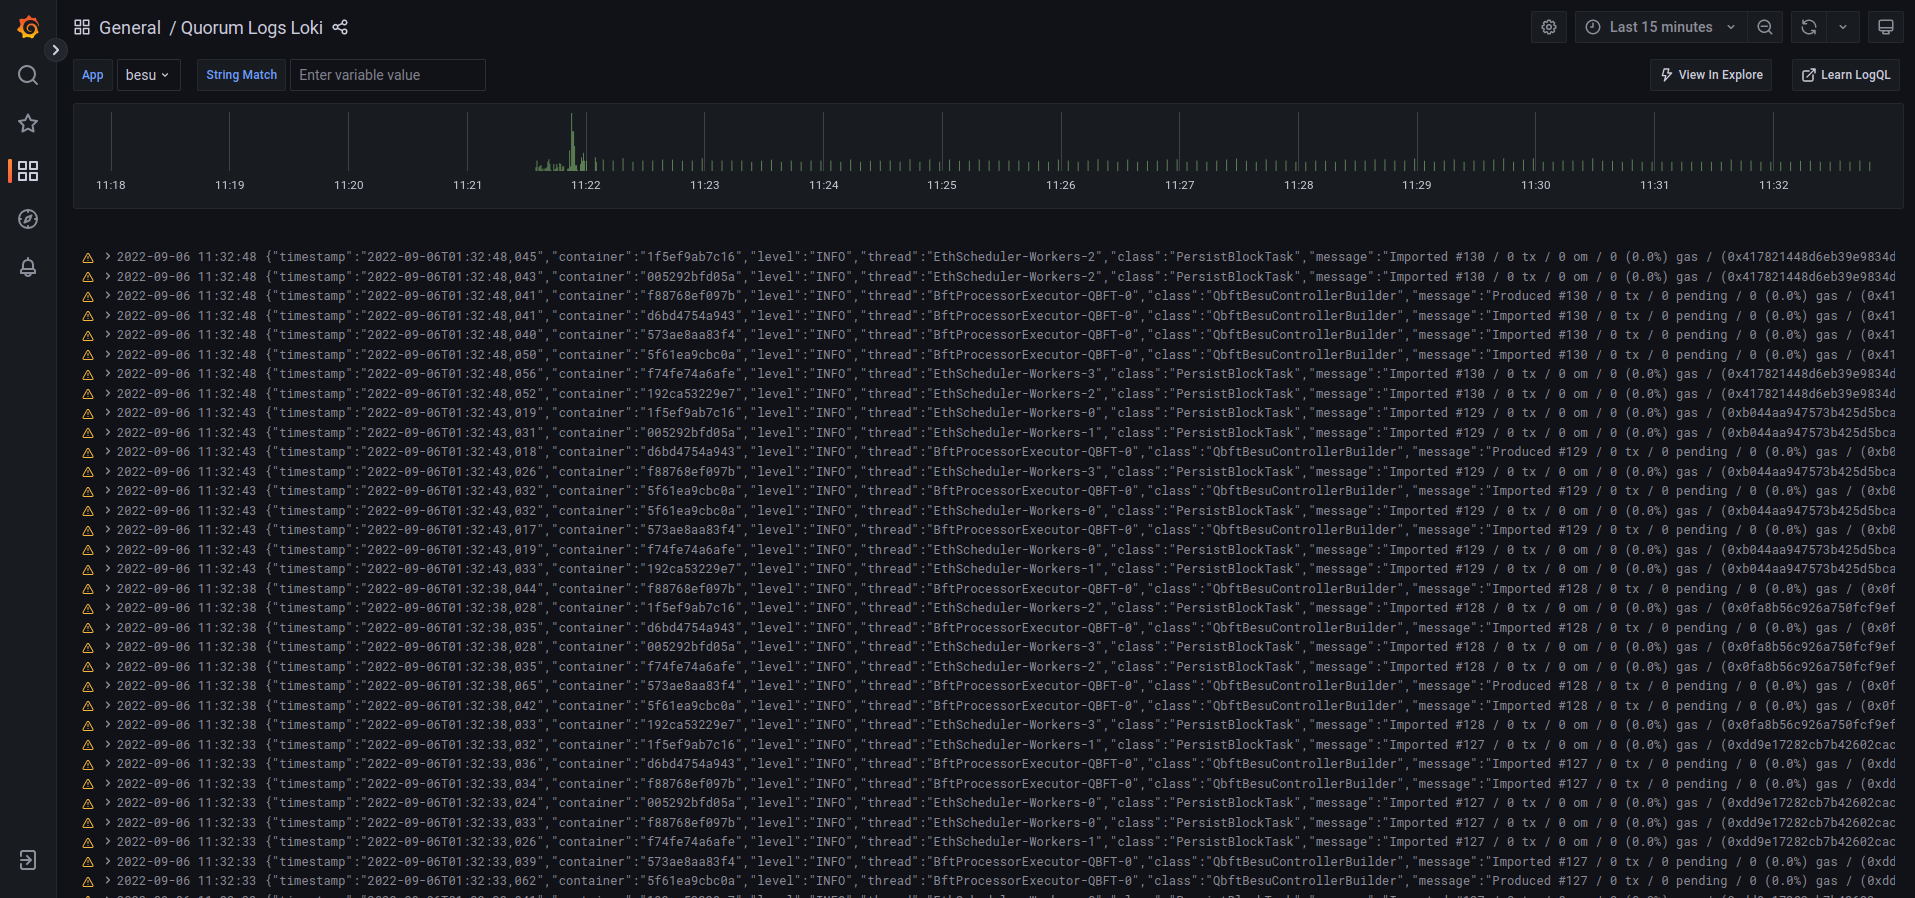
- Use the Grafana Loki logs address to access the logs in Grafana. Read more about log management.
To display the list of endpoints again, run:
./list.sh
Use a block explorer
You can use Sirato Blockchain Explorer to analyze block information, contract metadata, transaction searches, and more. Sirato has built-in support for privacy-enabled Besu networks.
You must connect to one of the privacy nodes (for example, member1besu), not the dedicated RPC, in order to allow access for Besu privacy API methods. In production networks, you must secure access to RPC nodes.
Clone the Sirato GitHub repository:
git clone https://github.com/web3labs/sirato-free
From the Sirato directory, run the following command:
cd docker-compose
NODE_ENDPOINT=member1besu PORT=26000 docker-compose -f docker-compose.yml -f sirato-extensions/docker-compose-quorum-dev-quickstart.yml up
Open http://localhost/ on your browser. You’ll see the new initialization page while it boots up. This may take 5–10 minutes for the all services to start and the ingestion sync to complete.
To stop all the services from running, run the following script from the docker-compose directory:
docker-compose down -v
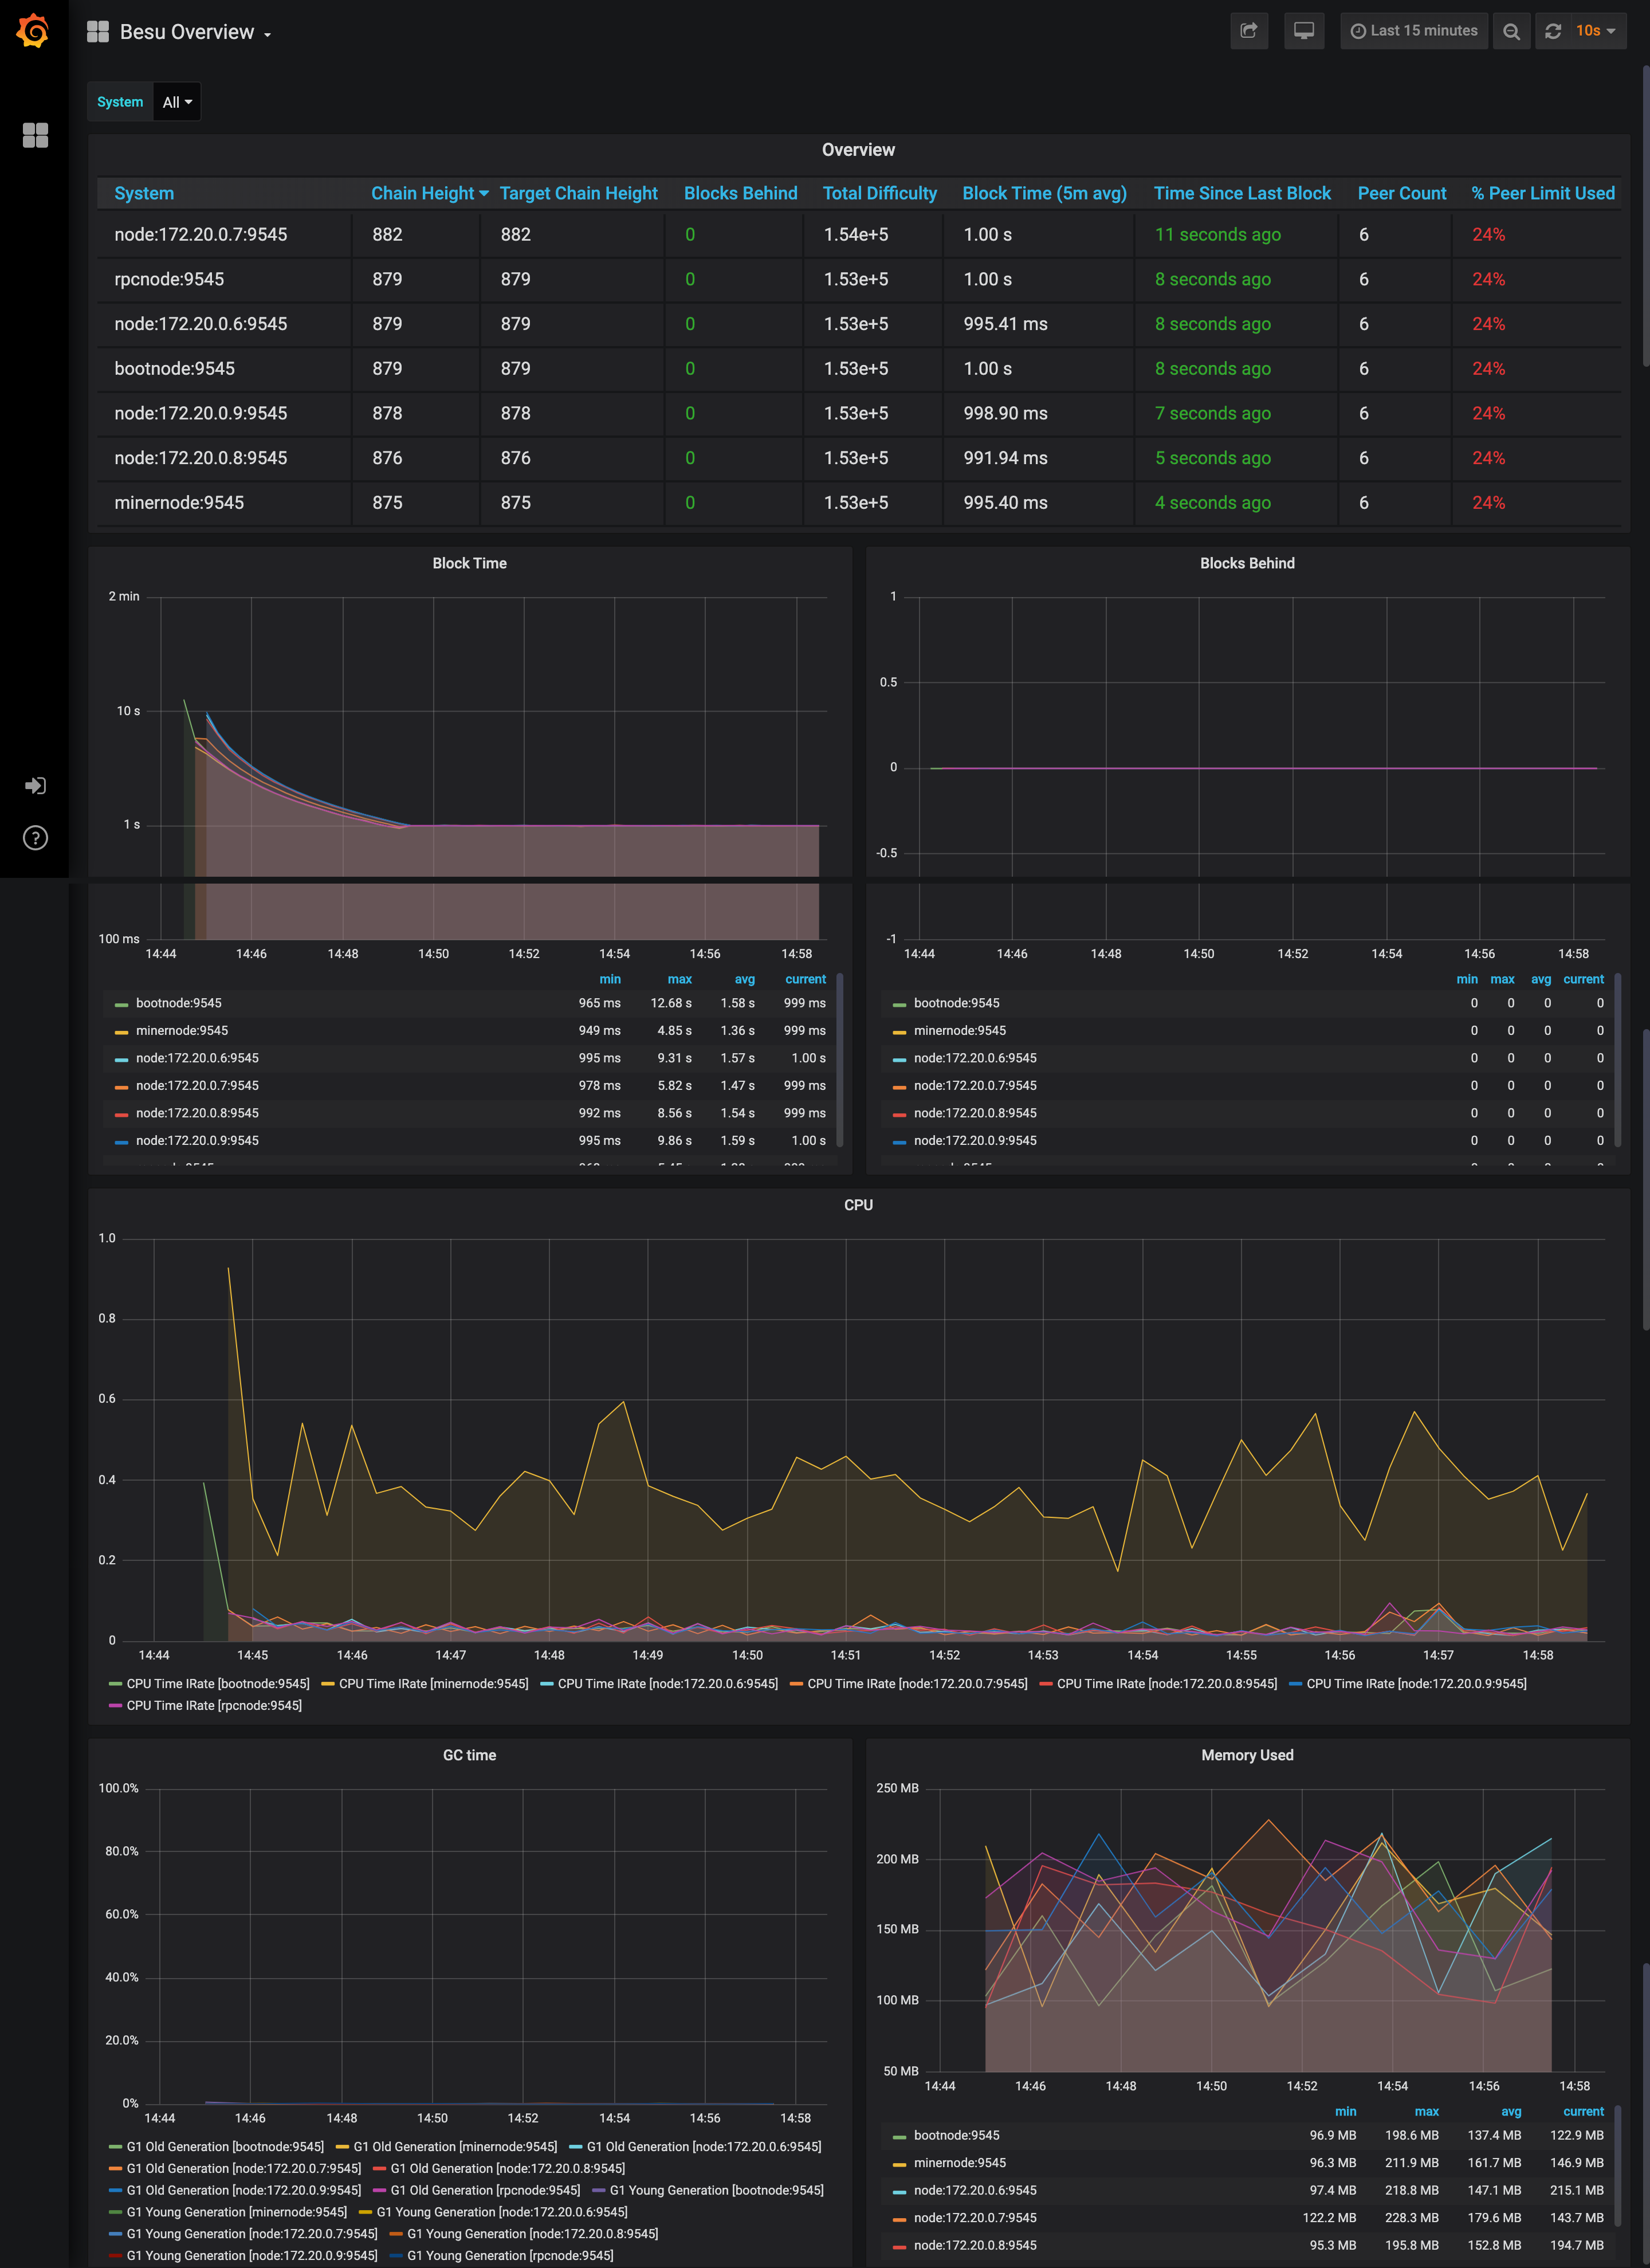
Monitor nodes with Prometheus and Grafana
The sample network also includes Prometheus and Grafana monitoring tools to let you visualize node health and usage. You can directly access these tools from your browser at the addresses displayed in the endpoint list.
For more details on how to configure and use these tools for your own nodes, see the performance monitoring documentation, Prometheus documentation and Grafana documentation.
and collated logs via Grafana Loki
Run JSON-RPC requests
You can run JSON-RPC requests on:
- HTTP with
http://localhost:8545. - WebSockets with
ws://localhost:8546.
Run with cURL
This tutorial uses cURL to send JSON-RPC requests over HTTP.
Run with Postman
You can also run all the requests with the Besu Postman collection.
View the Besu JSON-RPC APIs documentation in the Postman format and obtain example requests in multiple coding languages.
Run in Postman
Click the following button to fork the collection and run requests directly on your local network.
 .
.
Download collection
Alternatively you can download the JSON collection file.
Request the node version
Run the following command from the host shell:
curl -X POST --data '{"jsonrpc":"2.0","method":"web3_clientVersion","params":[],"id":1}' http://localhost:8545
The result displays the client version of the running node:
- Result example
- Result explanation
{
  "jsonrpc": "2.0",
  "id": 1,
  "result": "besu/v21.1.2/linux-x86_64/oracle_openjdk-java-11"
}
"jsonrpc" : "2.0"indicates that the JSON-RPC 2.0 spec format is used."id" : 1is the request identifier used to match the request and the response. This tutorial always uses 1."result"contains the running Besu information:v21.1.2is the running Besu version number. This may be different when you run this tutorial.linux-x86_64is the architecture used to build this version.oracle_openjdk-java-11is the JVM type and version used to build this version. This may be different when you run this tutorial.
Successfully calling this method shows that you can connect to the nodes using JSON-RPC over HTTP.
From here, you can walk through more interesting requests demonstrated in the rest of this section, or skip ahead to Create a transaction using MetaMask.
Count the peers
Peers are the other nodes connected to the node receiving the JSON-RPC request.
Poll the peer count using net_peerCount:
curl -X POST --data '{"jsonrpc":"2.0","method":"net_peerCount","params":[],"id":1}' http://localhost:8545
The result indicates that there are four peers (the validators):
{
  "jsonrpc": "2.0",
  "id": 1,
  "result": "0x4"
}
Request the most recent block number
Call eth_blockNumber to retrieve the number of the most recently synchronized block:
curl -X POST --data '{"jsonrpc":"2.0","method":"eth_blockNumber","params":[],"id":1}' http://localhost:8545
The result indicates the highest block number synchronized on this node.
{
  "jsonrpc": "2.0",
  "id": 1,
  "result": "0x2a"
}
Here the hexadecimal value 0x2a translates to decimal as 42, the number of blocks received by the node so far, about two minutes after the new network started.
Create a transaction using MetaMask
You can use MetaMask to send a transaction on your private network.
- Open MetaMask and connect it to your private network RPC endpoint by selecting
Localhost 8545in the network list. - Choose one of the following test accounts and import it into MetaMask by copying the corresponding private key.
The following accounts are test accounts and their private keys are publicly visible in this documentation and in publicly available source code.
They are not secure and everyone can use them.
Using test accounts on Ethereum Mainnet and production networks can lead to loss of funds and identity fraud.
In this documentation, we only provide test accounts for ease of testing and learning purposes; never use them for other purposes.
Always secure your Ethereum Mainnet and any production account properly.
See for instance MyCrypto "Protecting Yourself and Your Funds" guide.
0xfe3b557e8fb62b89f4916b721be55ceb828dbd73)"Private key to copy :
0x8f2a55949038a9610f50fb23b5883af3b4ecb3c3bb792cbcefbd1542c692be63
Initial balance : 200 Eth (200000000000000000000 Wei)
0x627306090abaB3A6e1400e9345bC60c78a8BEf57)"Private key to copy :
0xc87509a1c067bbde78beb793e6fa76530b6382a4c0241e5e4a9ec0a0f44dc0d3
Initial balance : 90000 Eth (90000000000000000000000 Wei)
0xf17f52151EbEF6C7334FAD080c5704D77216b732)"Private key to copy :
0xae6ae8e5ccbfb04590405997ee2d52d2b330726137b875053c36d94e974d162f
Initial balance : 90000 Eth (90000000000000000000000 Wei)
Besu doesn't incorporate account management. To create your own account, you have to use a third-party tool, such as MetaMask.
After importing an existing test account, create another test account from scratch to use as the recipient for a test Ether transaction.
In MetaMask, select the new test account and copy its address.
In the Block Explorer, search for the new test account by selecting the 🔍 and pasting the test account address into the search box.
The new test account displays with a zero balance.
Send test Ether from the first test account (containing test Ether) to the new test account (which has a zero balance).
tipYou can use a zero gas price here as this private test network is a free gas network, but the maximum amount of gas that can be used (the gas limit) for a value transaction must be at least 21000.
Refresh the Block Explorer page in your browser displaying the target test account.
The updated balance reflects the transaction completed using MetaMask.
Smart contract and dapp usage
You can use a demo dapp called Pet Shop, provided by Truffle.
The dapp runs a local website using Docker, and uses smart contracts deployed on the network.
The directory created by quorum-dev-quickstart includes a dapps directory with a pet-shop subdirectory, which contains the source code for the dapp, including the smart contracts, website, and configurations to run this tutorial.
With the blockchain running and MetaMask connected to Localhost 8545 via the browser, run the following command to start the Pet Shop dapp:
cd dapps/pet-shop
./run_dapp.sh
The script:
- Installs the dapp Node dependencies (you may see some warnings here, but it will not prevent the dapp from running).
- Compiles the contracts.
- Deploys the contracts to the blockchain.
- Runs tests.
- Builds and runs a Docker image to serve the dapp website.
Compiling your contracts...
===========================
> Compiling ./contracts/Adoption.sol
> Compiling ./contracts/Migrations.sol
> Artifacts written to /Users/demo/quorum-test-network/dapps/pet-shop/pet-shop-box/build/contracts
> Compiled successfully using:
    - solc: 0.5.16+commit.9c3226ce.Emscripten.clang

Starting migrations...
======================
> Network name:    'quickstartWallet'
> Network id:      1337
> Block gas limit: 16234336 (0xf7b760)

1_initial_migration.js
======================

    Deploying 'Migrations'
    ----------------------
    > transaction hash:    0xdd27f5bc5b0c4a42bb4f4d9ba00b4d33742de10ba8f03484cbf095ee824ba11a
    > Blocks: 0            Seconds: 0
    > contract address:    0xFB88dE099e13c3ED21F80a7a1E49f8CAEcF10df6
    > block number:        2747
    > block timestamp:     1618000437
    > account:             0x627306090abaB3A6e1400e9345bC60c78a8BEf57
    > balance:             89999.97435026
    > gas used:            221555 (0x36173)
    > gas price:           20 gwei
    > value sent:          0 ETH
    > total cost:          0.0044311 ETH


    > Saving migration to chain.
    > Saving artifacts
      -------------------------------------
    > Total cost:           0.0044311 ETH

2_deploy_contracts.js
=====================

    Deploying 'Adoption'
    --------------------
    > transaction hash:    0xd6f5b11807a0727a92b6063c95b9101769d310592b0d3cf35d6df233d05d50e6
    > Blocks: 0            Seconds: 0
    > contract address:    0xf204a4Ef082f5c04bB89F7D5E6568B796096735a
    > block number:        2749
    > block timestamp:     1618000441
    > account:             0x627306090abaB3A6e1400e9345bC60c78a8BEf57
    > balance:             89999.968712
    > gas used:            239915 (0x3a92b)
    > gas price:           20 gwei
    > value sent:          0 ETH
    > total cost:          0.0047983 ETH


    > Saving migration to chain.
    > Saving artifacts
      -------------------------------------
    > Total cost:           0.0047983 ETH

Summary
=======
> Total deployments:   2
> Final cost:          0.0092294 ETH


Using network 'quickstartWallet'.

Compiling your contracts...
===========================
> Compiling ./test/TestAdoption.sol

TestAdoption
✓ testUserCanAdoptPet (2071ms)
✓ testGetAdopterAddressByPetId (6070ms)
✓ testGetAdopterAddressByPetIdInArray (6077ms)

3 passing (37s)
After these tests are successful, the script builds a container for the Pet Shop dapp and deploys it, binding it to port 3001 on your system.
Sending build context to Docker daemon  489.4MB
Step 1/5 : FROM node:12.14.1-stretch-slim
---> 2f7e25ad14ea
Step 2/5 : EXPOSE 3001
---> Using cache
---> 2ef0665a040a
Step 3/5 : WORKDIR /app
---> Using cache
---> e8e97cedb575
Step 4/5 : COPY . /app
---> f70e4265e598
Step 5/5 : CMD npm run dev
---> Running in 3c6e8bdb3f3b
Removing intermediate container 3c6e8bdb3f3b
---> ce2588e47ab0
Successfully built ce2588e47ab0
Successfully tagged quorum-dev-quickstart_pet_shop:latest
b1615ab765656bc027f63fc60019dba1ca572305766c820f41eaf113b7e14cf8
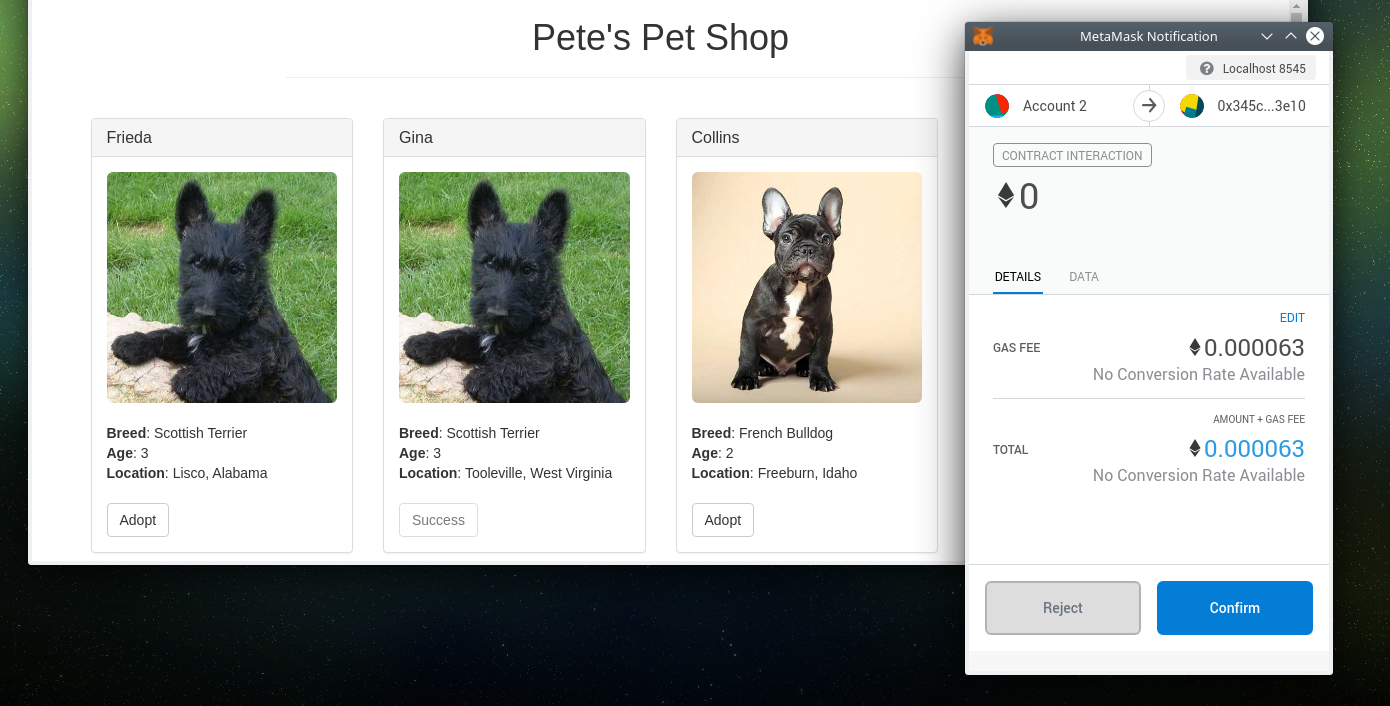
In the browser where you have MetaMask enabled and one of the test accounts loaded, open a new tab and navigate to the Pet Shop dapp where you can adopt lovely pets (sorry, not for real, it's a demo).
When you select Adopt, a MetaMask window pops up and requests your permission to continue with the transaction.
After the transaction is complete and successful, the status of the pet you adopted shows Success.
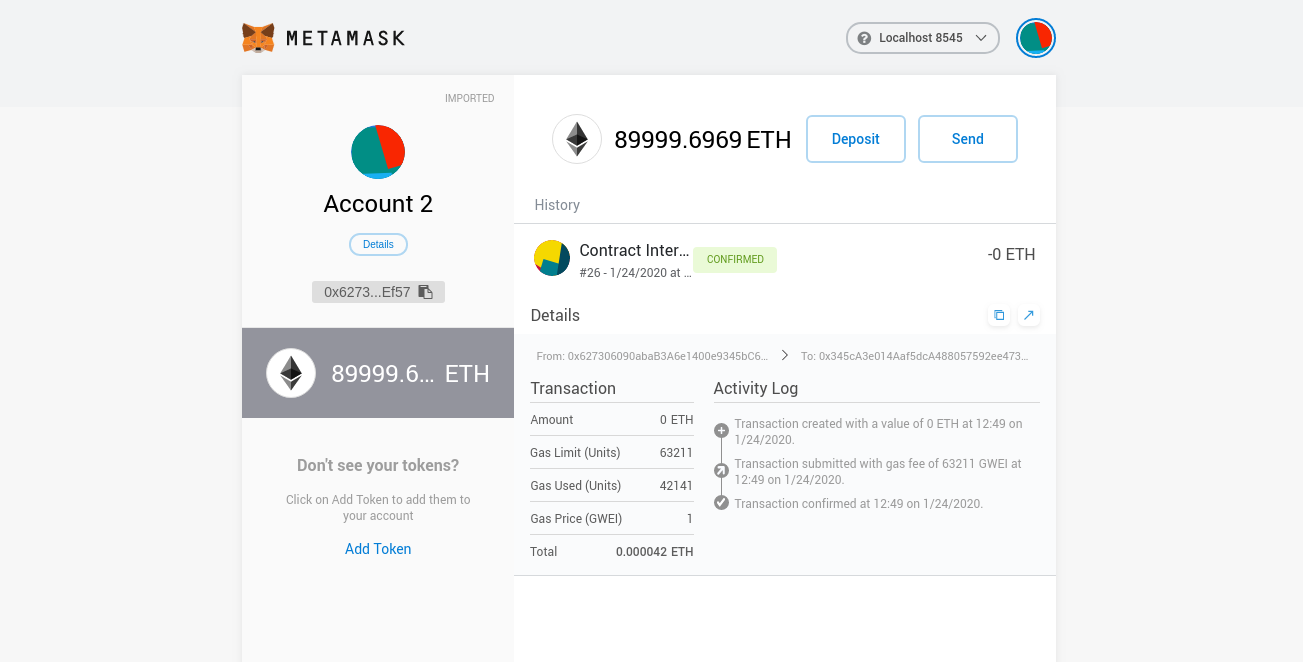
You can also search for the transaction and view its details in the Block Explorer.
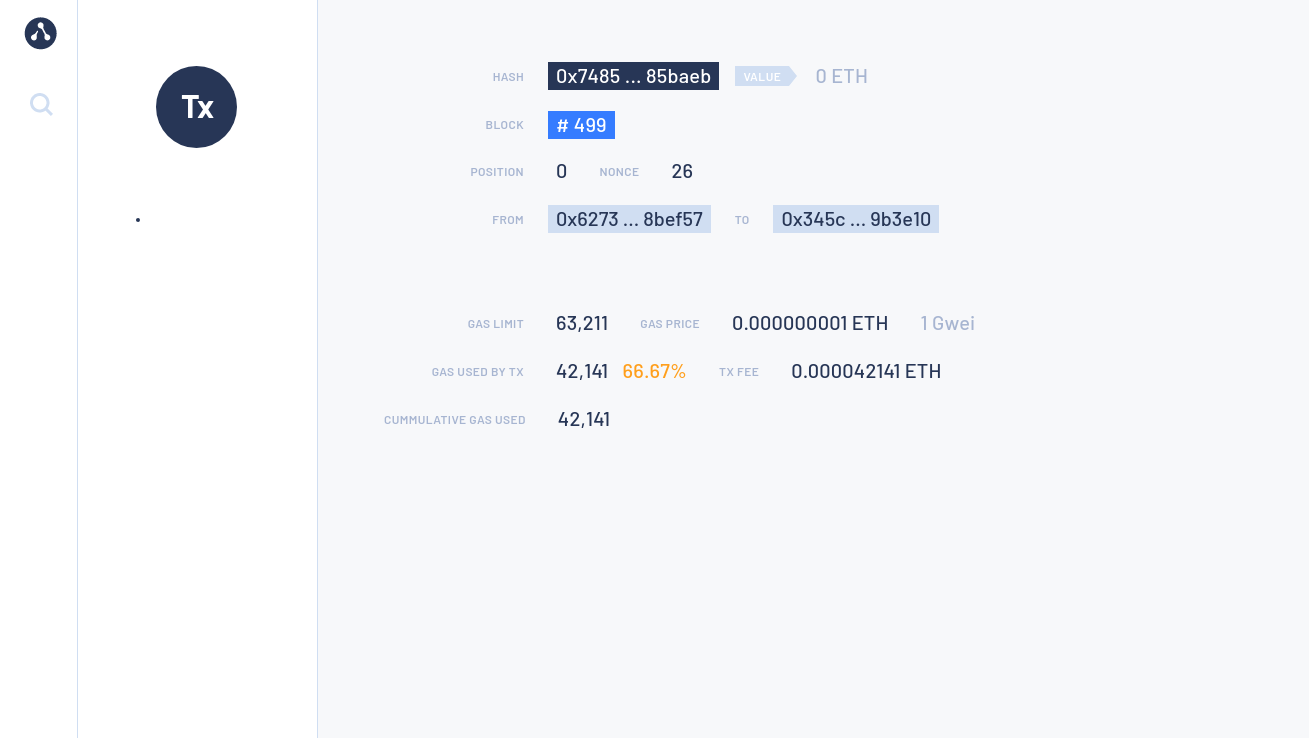
The MetMask UI also keeps a record of the transaction.
Deploy your own dapp
You can deploy your own dapp to the Quorum Developer Quickstart, by configuring your dapp to point to the Quickstart network.
If you're using Truffle, update the networks object in the Truffle configuration file to specify which networks to connect to for deployments and testing. The Quickstart RPC service endpoint is http://localhost:8545.
For example, the following is the Truffle configuration file for the Pet Shop dapp used in the Quickstart Besu network:
const PrivateKeyProvider = require("@truffle/hdwallet-provider");

// insert the private key of the account used in MetaMask, e.g. Account 1 (Miner Coinbase Account)
const privateKey =
  "c87509a1c067bbde78beb793e6fa76530b6382a4c0241e5e4a9ec0a0f44dc0d3";

module.exports = {
  networks: {
    development: {
      host: "127.0.0.1",
      port: 7545,
      network_id: "*", // Match any network id
    },
    develop: {
      port: 8545,
    },
    quickstartWallet: {
      provider: () =>
        new PrivateKeyProvider(privateKey, "http://localhost:8545"),
      network_id: "*",
    },
  },
};
Deploy the dapp using:
truffle migrate --network quickstartWallet
Stop and restart the private network without removing containers
To shut down the private network without deleting the containers:
./stop.sh
This command stops the containers related to the services specified in the docker-compose.yml file.
To restart the private network:
./resume.sh
Stop the private network and remove containers
To shut down the private network and delete all containers and images created from running the sample network and the Pet Shop dapp:
./remove.sh
Add a new node to the network
New nodes joining an existing network require the following:
- The same genesis file used by all other nodes on the running network.
- A list of nodes to connect to; this is done by specifying bootnodes, or by providing a list of static nodes.
- A node key pair and optionally an account. If the running network is using permissions, then you need to add the new node's enode details to the permissions file used by existing nodes, or update the onchain permissioning contract.
The following steps describe the process to add a new node to the Developer Quickstart.
1. Create the node key files
Create a node key pair and account for a new node by running the following script:
cd ./extra
npm install
node generate_node_keys.js --password "Password"
The --password parameter is optional.
2. Create new node directory
Navigate to the directory where the configuration files for the network were created.
The directory was specified in an earlier step when running npx quorum-dev-quickstart. The default location is ./quorum-test-network.
In the config/nodes directory, create a subdirectory for the new node (for example, newnode), and move the nodekey, nodekey.pub, address and accountkey files from the previous step into this directory.
3. Update docker-compose
Add an entry for the new node into the docker-compose file:
newnode:
  <<: *besu-def
  container_name: newnode
  volumes:
    - public-keys:/opt/besu/public-keys/
    - ./config/besu/:/config
    - ./config/nodes/newnode:/opt/besu/keys
    - ./logs/besu:/tmp/besu
  depends_on:
    - validator1
  networks:
    quorum-dev-quickstart:
      ipv4_address: 172.16.239.41
Select an IP address and port map not being used for the other containers.
Mount the newly created folder ./config/nodes/newnode to the /opt/besu/keys directory of the new node, as seen
in this example.
4. Update Prometheus configuration
Update prometheus.yml in the ./config/prometheus/ directory to configure metrics to display in Grafana.
Insert the following under scrape_configs section in the file. Change job_name and targets appropriately if you've updated them.
- job_name: newnode
  scrape_interval: 15s
  scrape_timeout: 10s
  metrics_path: /metrics
  scheme: http
  static_configs:
    - targets: [newnode:9545]
5. Update files with the enode address
Add the new node's enode address to the static nodes file and permissions file. The enode uses the format enode://pubkey@ip_address:30303. If the nodekey.pub is 4540ea...9c1d78 and the IP address is 172.16.239.41, then the enode address is "enode://4540ea...9c1d78@172.16.239.41:30303", which must be added to both files.
Alternatively, call the perm_addNodesToAllowlist API method on existing nodes to add the new node without restarting.
Calling the API method by itself only persists for as long as the nodes remain online and is lost on the next restart.
On a live network, the new node must be added to the permissions file so that subsequent restarts of the nodes are aware of the change.
6. Start the network
Once complete, start the network up with ./run.sh. When using the smart contract you can either make changes via a dapp or via RPC API calls.