Deploy charts
You can deploy Besu Helm charts for a Kubernetes cluster.
Prerequisites
- Clone the Quorum-Kubernetes repository
- A running Kubernetes cluster
- Install Kubectl
- Install Helm3
Provision with Helm charts
Helm is a method of packaging a collection of objects into a chart which can then be deployed to the cluster. After you have cloned the Quorum-Kubernetes repository, change the directory to helm for the rest of this tutorial.
cd helm
Each helm chart has the following key-map values which you will need to set depending on your needs. The cluster.provider is used as a key for the various cloud features enabled. Please specify only one cloud provider, not both. At present, the charts have full support for cloud native services in both AWS and Azure. Please note that if you use GCP, IBM etc please set cluster.provider: local and set cluster.cloudNativeServices: false.
Please update the aws or azure map as shown below if you deploy to either cloud provider.
cluster:
  provider: local  # choose from: local | aws | azure
  cloudNativeServices: false # set to true to use Cloud Native Services (SecretsManager and IAM for AWS; KeyVault & Managed Identities for Azure)
  reclaimPolicy: Delete # set to either Retain or Delete; note that PVCs and PVs will still exist after a 'helm delete'. Setting to Retain will keep volumes even if PVCs/PVs are deleted in kubernetes. Setting to Delete will remove volumes from EC2 EBS when PVC is deleted

quorumFlags:
  privacy: false
  removeKeysOnDelete: false

aws:
  # the aws cli commands uses the name 'quorum-node-secrets-sa' so only change this if you altered the name
  serviceAccountName: quorum-node-secrets-sa
  # the region you are deploying to
  region: ap-southeast-2

azure:
  # the script/bootstrap.sh uses the name 'quorum-pod-identity' so only change this if you altered the name
  identityName: quorum-pod-identity
  # the clientId of the user assigned managed identity created in the template
  identityClientId: azure-clientId
  keyvaultName: azure-keyvault
  # the tenant ID of the key vault
  tenantId: azure-tenantId
  # the subscription ID to use - this needs to be set explictly when using multi tenancy
  subscriptionId: azure-subscriptionId
Setting the cluster.cloudNativeServices: true:
- Stores keys in Azure Key Vault or AWS Secrets Manager.
- Uses Azure Managed Identities or AWS Identity and Access Management for pod identity access.
You can customize any of the charts in this repository to suit your requirements, and make pull requests to extend functionality.
1. Check that you can connect to the cluster with kubectl
Verify kubectl is connected to cluster using: (use the latest version)
kubectl version
The result looks similar to:
Client Version: version.Info{Major:"1", Minor:"23", GitVersion:"v1.23.1", GitCommit:"86ec240af8cbd1b60bcc4c03c20da9b98005b92e", GitTreeState:"clean", BuildDate:"2021-12-16T11:41:01Z", GoVersion:"go1.17.5", Compiler:"gc", Platform:"linux/amd64"}
Server Version: version.Info{Major:"1", Minor:"22", GitVersion:"v1.22.3", GitCommit:"c92036820499fedefec0f847e2054d824aea6cd1", GitTreeState:"clean", BuildDate:"2021-10-27T18:35:25Z", GoVersion:"go1.16.9", Compiler:"gc", Platform:"linux/amd64"}
2. Create the namespace
This tutorial isolates groups of resources (for example, StatefulSets and Services) within a single cluster.
The rest of this tutorial uses besu as the namespace, but you're free to pick any name when deploying, as long as it's consistent across the infrastructure scripts and charts.
Run the following in a terminal window:
kubectl create namespace besu
3. Deploy the monitoring chart
This chart deploys Prometheus and Grafana to monitor the metrics of the cluster, nodes and state of the network.
Update the admin username and password in the monitoring values file. Configure alerts to the receiver of your choice (for example, email or Slack), then deploy the chart using:
helm repo add prometheus-community https://prometheus-community.github.io/helm-charts
helm repo update
helm install monitoring prometheus-community/kube-prometheus-stack --version 34.10.0 --namespace=besu --values ./values/monitoring.yml --wait
kubectl --namespace besu apply -f  ./values/monitoring/
Metrics are collected via a ServiceMonitor that scrapes each Besu pod, using given annotations which specify the port and path to use. For example:
  template:
    metadata:
      annotations:
        prometheus.io/scrape: "true"
        prometheus.io/port: 9545
        prometheus.io/path: "/metrics"
For production use cases, configure Grafana with one of the supported native auth mechanisms.
Optionally you can also deploy the Elastic Stack to view logs (and metrics).
helm repo add elastic https://helm.elastic.co
helm repo update
# if on cloud
helm install elasticsearch --version 7.17.1 elastic/elasticsearch --namespace quorum --values ./values/elasticsearch.yml
# if local - set the replicas to 1
helm install elasticsearch --version 7.17.1 elastic/elasticsearch --namespace quorum --values ./values/elasticsearch.yml --set replicas=1 --set minimumMasterNodes: 1
helm install kibana --version 7.17.1 elastic/kibana --namespace quorum --values ./values/kibana.yml
helm install filebeat --version 7.17.1 elastic/filebeat  --namespace quorum --values ./values/filebeat.yml
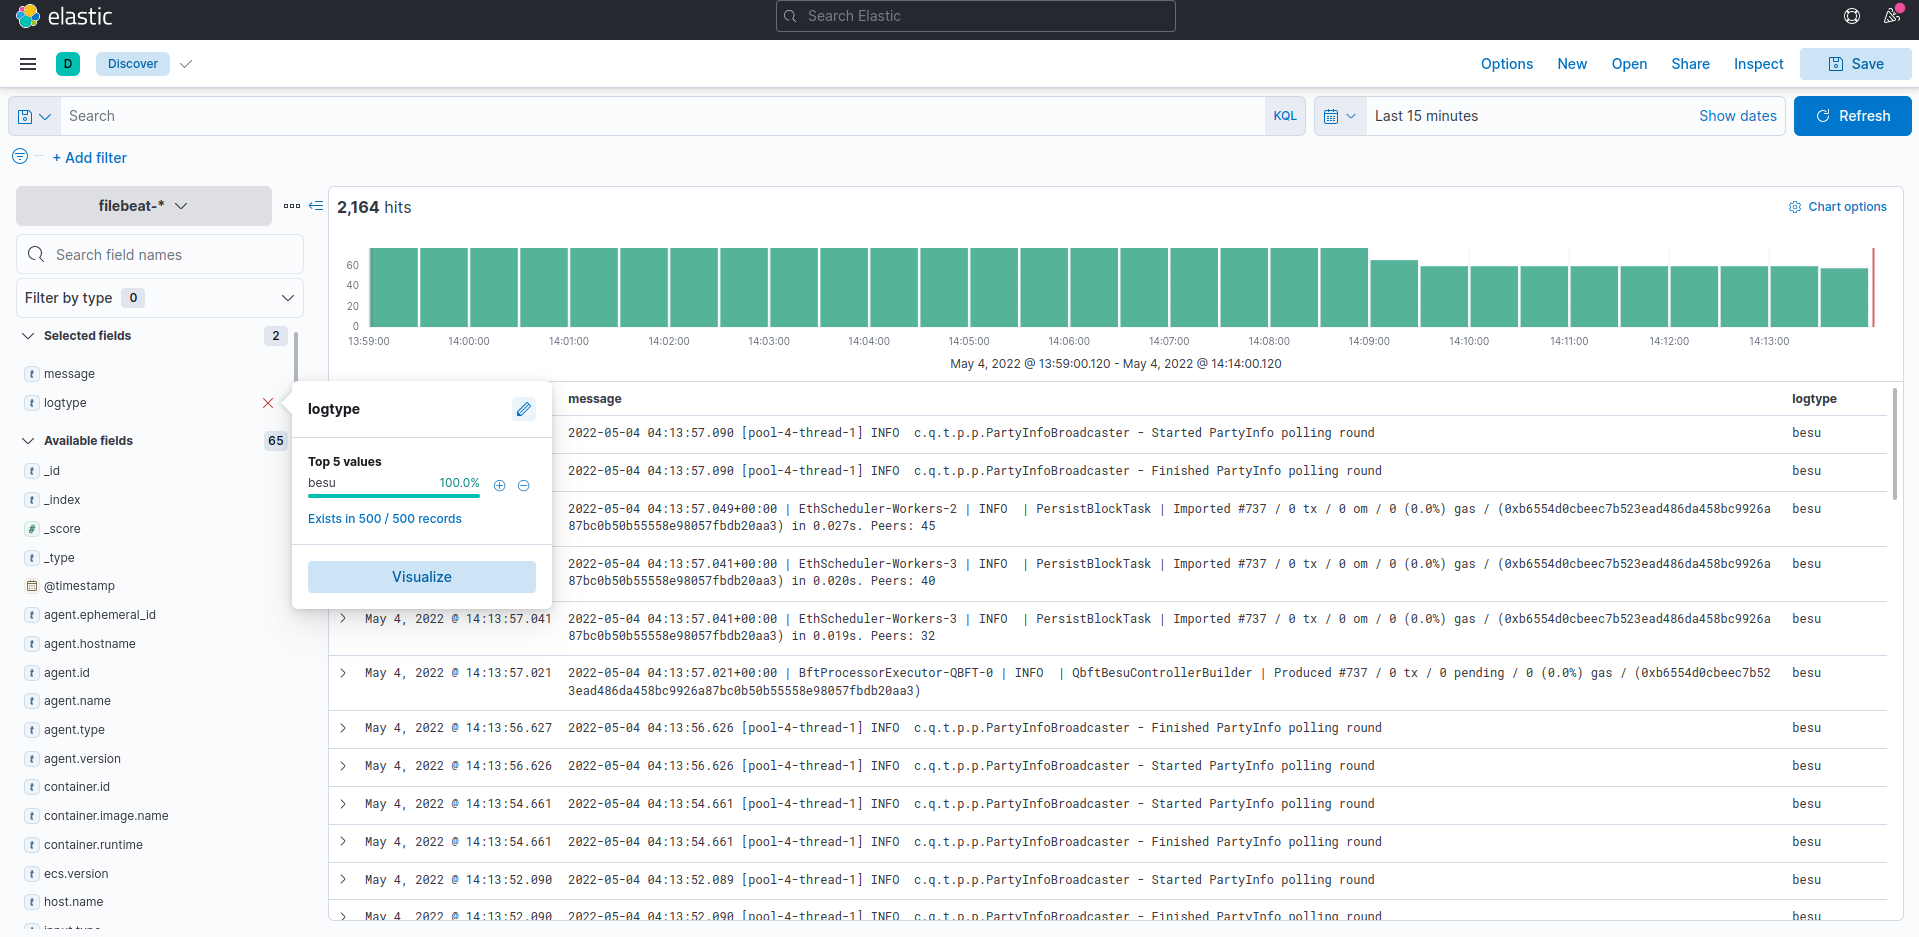
If you install filebeat, please create a filebeat-* index pattern in kibana. All the logs from the nodes are sent to the filebeat index. If you use The Elastic stack for logs and metrics, please deploy metricbeat in a similar manner to filebeat and create an index pattern in Kibana.
To connect to Kibana or Grafana, we also need to deploy an ingress so you can access your monitoring endpoints publicly. We use Nginx as our ingress here, and you are free to configure any ingress per your requirements.
helm repo add ingress-nginx https://kubernetes.github.io/ingress-nginx
helm repo update
helm install quorum-monitoring-ingress ingress-nginx/ingress-nginx \
    --namespace quorum \
    --set controller.ingressClassResource.name="monitoring-nginx" \
    --set controller.ingressClassResource.controllerValue="k8s.io/monitoring-ingress-nginx" \
    --set controller.replicaCount=1 \
    --set controller.nodeSelector."kubernetes\.io/os"=linux \
    --set defaultBackend.nodeSelector."kubernetes\.io/os"=linux \
    --set controller.admissionWebhooks.patch.nodeSelector."kubernetes\.io/os"=linux \
    --set controller.service.externalTrafficPolicy=Local

kubectl apply -f ../ingress/ingress-rules-monitoring.yml
Once complete, view the IP address listed under the Ingress section if you're using the Kubernetes Dashboard or on the command line kubectl -n quorum get services quorum-monitoring-ingress-ingress-nginx-controller.
We refer to the ingress here as external-nginx because it deals with monitoring endpoints specifically. We also deploy a second ingress called network-ingress which is for the blockchain nodes only in step 8
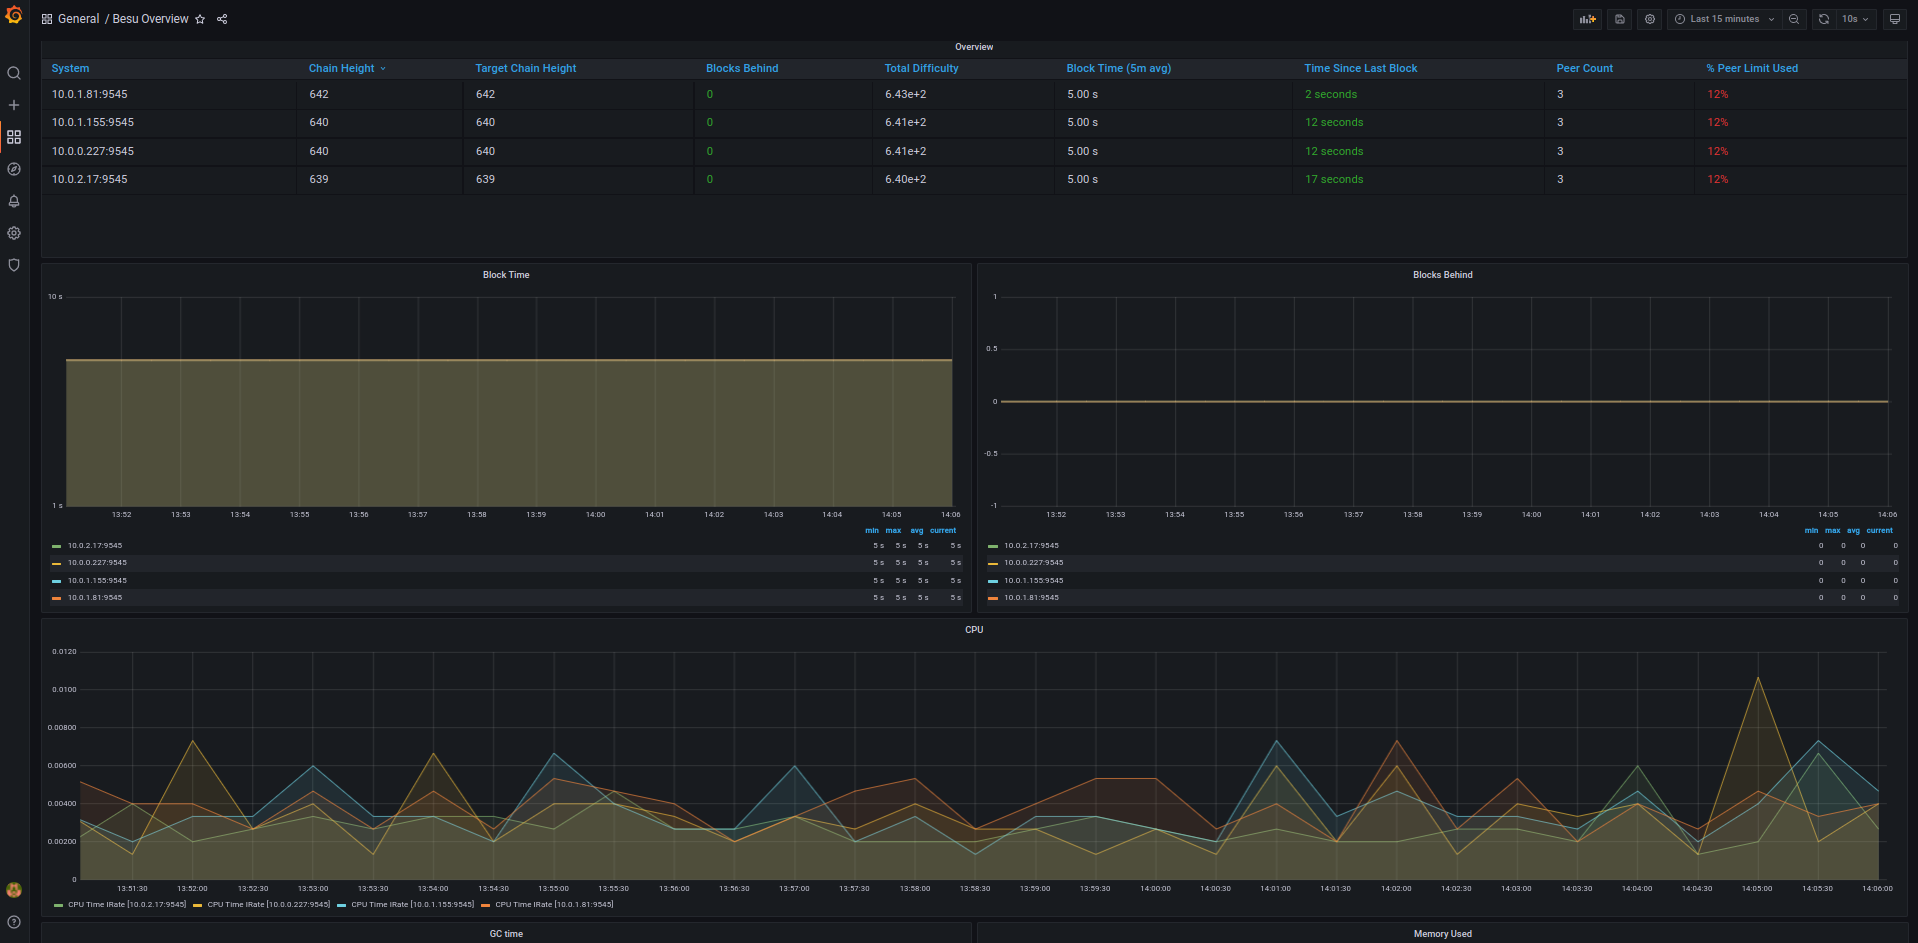
You can view the Besu dashboard by going to:
http://<INGRESS_IP>/d/XE4V0WGZz/besu-overview?orgId=1&refresh=10s
You can view the Kibana dashboard (if deployed) by going to:
http://<INGRESS_IP>/kibana
4. Deploy the genesis chart
The genesis chart creates the genesis file and keys for the validators.
It's important to keep the release names of the initial validator pool as per this tutorial, that is validator-n, where n is the node number. Any validators created after the initial pool can be named to anything you like.
The override values.yml looks like below:
---
quorumFlags:
  removeGenesisOnDelete: true

cluster:
  provider: local  # choose from: local | aws | azure
  cloudNativeServices: false

aws:
  # the aws cli commands uses the name 'quorum-node-secrets-sa' so only change this if you altered the name
  serviceAccountName: quorum-node-secrets-sa
  # the region you are deploying to
  region: ap-southeast-2

azure:
  # the script/bootstrap.sh uses the name 'quorum-pod-identity' so only change this if you altered the name
  identityName: quorum-pod-identity
  # the clientId of the user assigned managed identity created in the template
  identityClientId: azure-clientId
  keyvaultName: azure-keyvault
  # the tenant ID of the key vault
  tenantId: azure-tenantId
  # the subscription ID to use - this needs to be set explictly when using multi tenancy
  subscriptionId: azure-subscriptionId

# the raw Genesis config
# rawGenesisConfig.blockchain.nodes set the number of validators/signers
rawGenesisConfig:
  genesis:
    config:
      chainId: 1337
      algorithm:
        consensus: qbft # choose from: ibft | qbft | raft | clique
        blockperiodseconds: 10
        epochlength: 30000
        requesttimeoutseconds: 20
    gasLimit: '0x47b760'
    difficulty: '0x1'
    coinbase: '0x0000000000000000000000000000000000000000'
  blockchain:
    nodes:
      generate: true
      count: 4
    accountPassword: 'password'
Please set the aws, azure and cluster keys are as per the Provisioning step. quorumFlags.removeGenesisOnDelete: true tells the chart to delete the genesis file when the chart is deleted. If you may wish to retain the genesis on deletion, please set that value to false.
The last config item is rawGenesisConfig which has details of the chain you are creating, please edit any of the parameters in there to match your requirements. To set the number of initial validators set the rawGenesisConfig.blockchain.nodes to the number that you'd like. We recommend using the Byzantine formula of N=3F+1 when setting the number of validators.
One more thing to note is that when cluster.cloudNativeServices: true is set, the genesis job will not add the Quickstart test accounts into the genesis file.
When you are ready deploy the chart with :
cd helm
helm install genesis ./charts/besu-genesis --namespace besu --create-namespace --values ./values/genesis-besu.yml
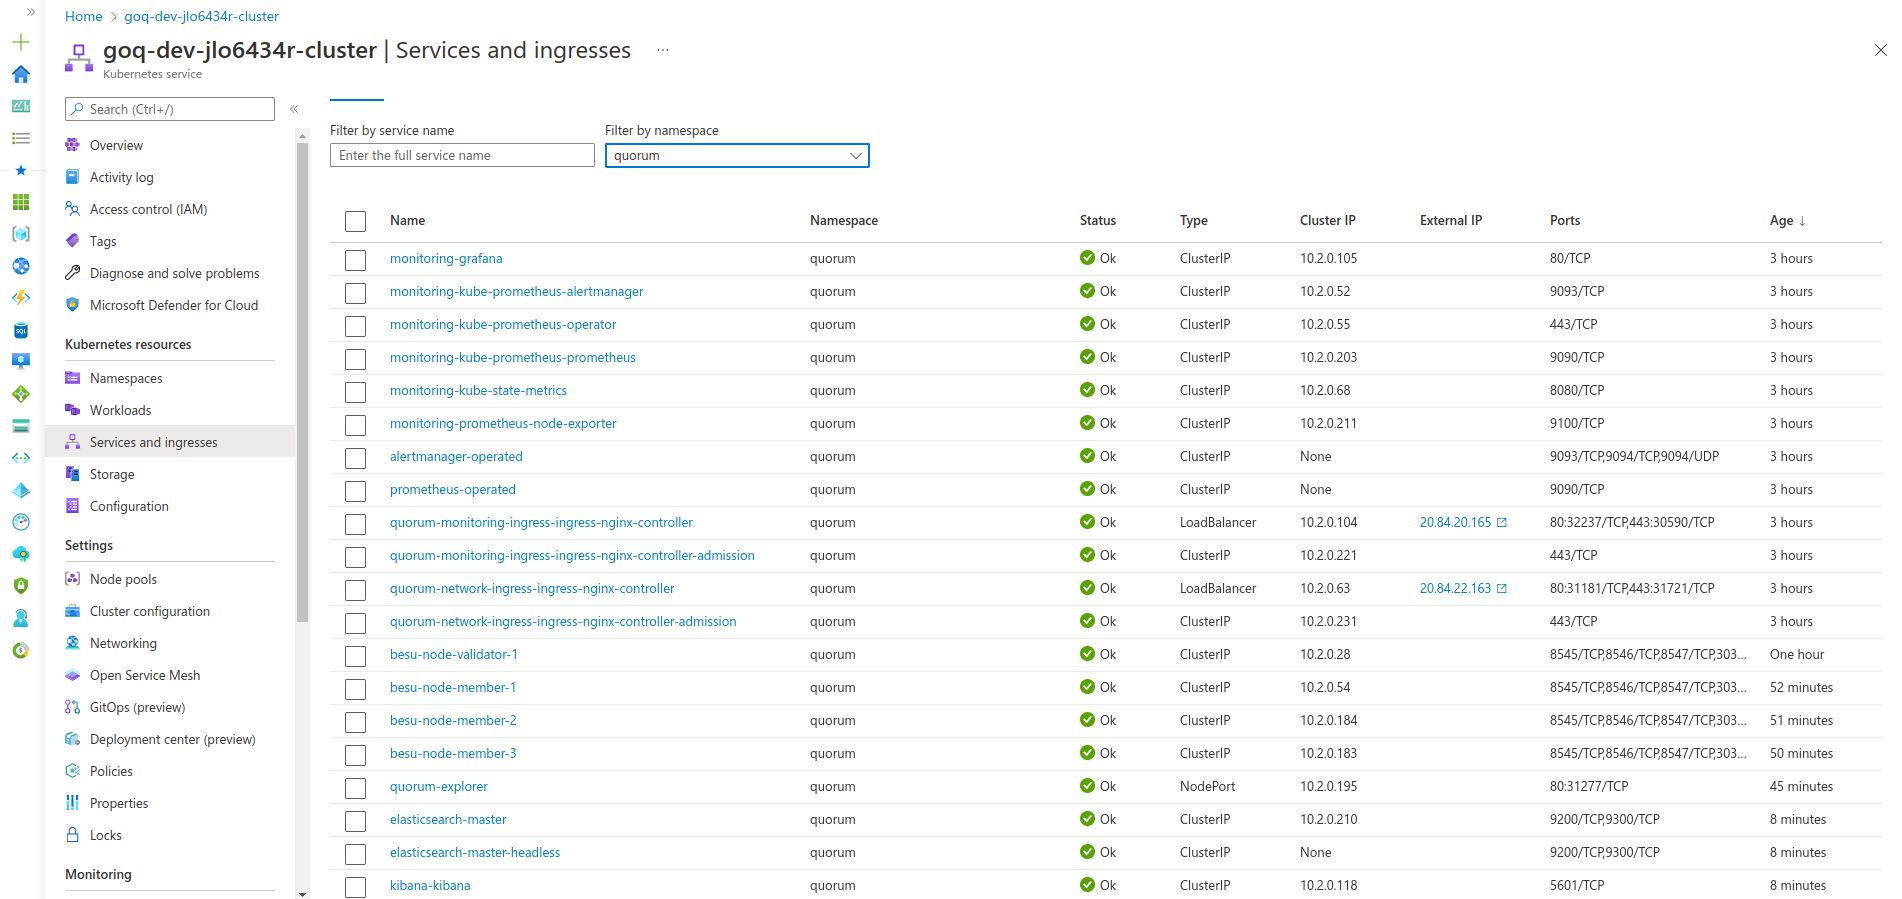
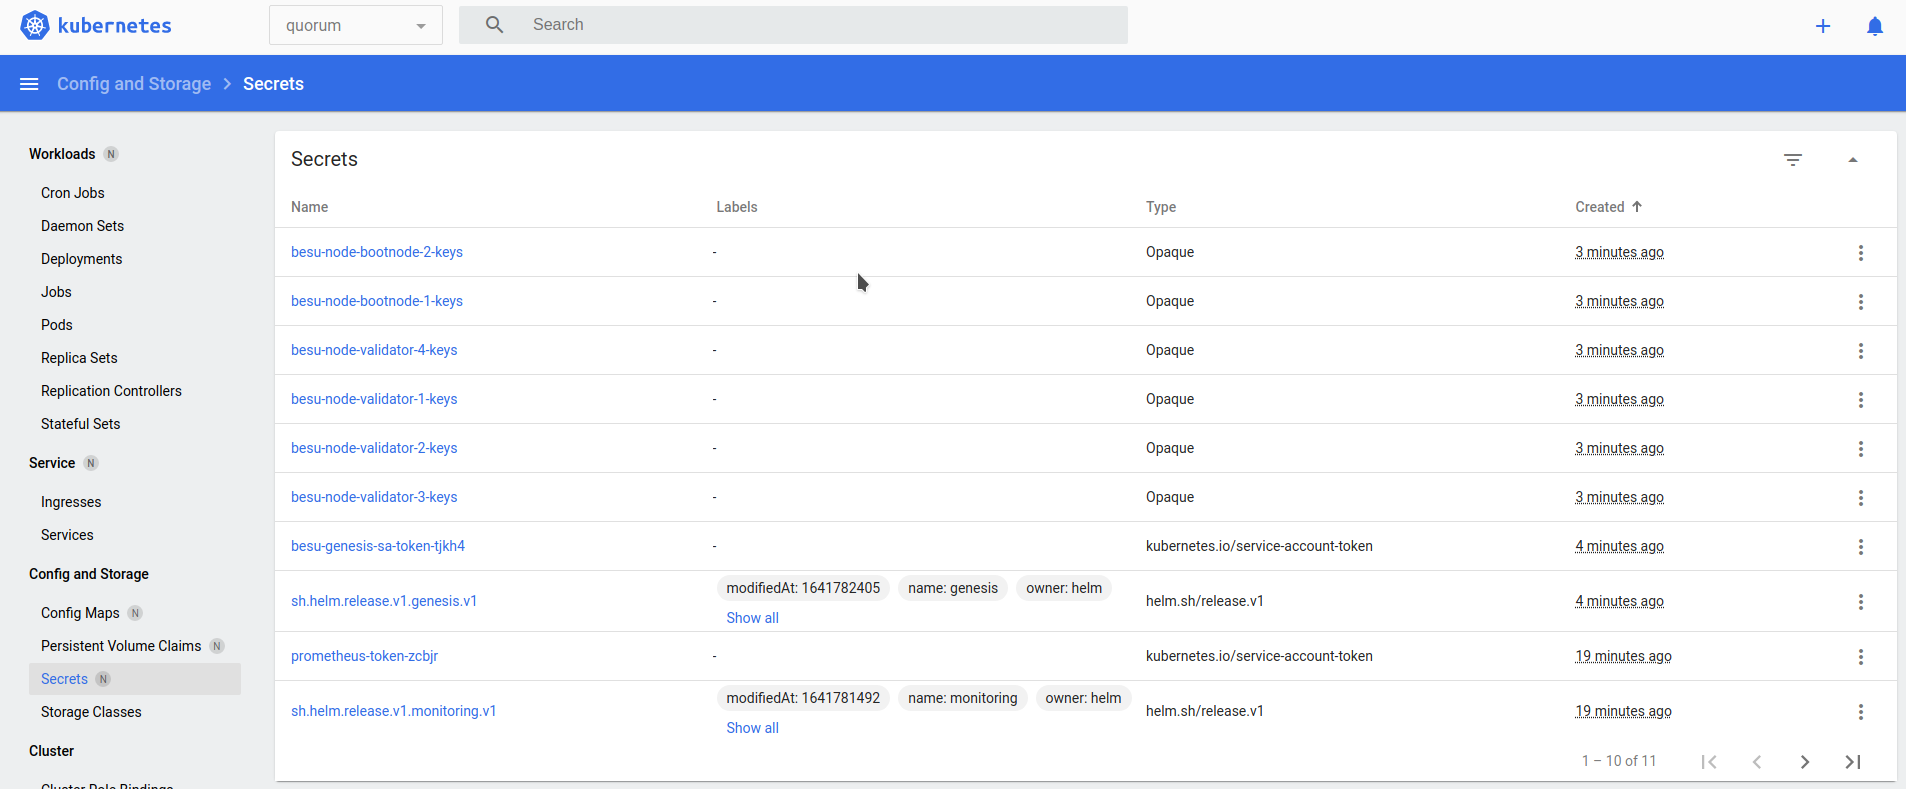
Once completed, view the genesis and enodes (the list of static nodes) configuration maps that every Besu node uses, and the validator and bootnode node keys as secrets.

5. Deploy the bootnodes
This is an optional but recommended step. In a production setup we recommend the use of two ore more bootnodes for best practices. Each Besu node has a map that tells the StatefulSet what to deploy and how to clean up. The default values.yml for the StatefulSet define the following flags which are present in all the override values files.
---
quorumFlags:
  privacy: false
  removeKeysOnDelete: true
  isBootnode: true    # set this to true if this node is a bootnode
  usesBootnodes: true # set this to true if the network you are connecting to use a bootnode/s that are deployed in the cluster

cluster:
  provider: local  # choose from: local | aws | azure
  cloudNativeServices: false
  reclaimPolicy: Delete # set to either Retain or Delete; note that PVCs and PVs will still exist after a 'helm delete'. Setting to Retain will keep volumes even if PVCs/PVs are deleted in kubernetes. Setting to Delete will remove volumes from EC2 EBS when PVC is deleted

aws:
  # the aws cli commands uses the name 'quorum-node-secrets-sa' so only change this if you altered the name
  serviceAccountName: quorum-node-secrets-sa
  # the region you are deploying to
  region: ap-southeast-2

azure:
  # the script/bootstrap.sh uses the name 'quorum-pod-identity' so only change this if you altered the name
  identityName: quorum-pod-identity
  # the clientId of the user assigned managed identity created in the template
  identityClientId: azure-clientId
  keyvaultName: azure-keyvault
  # the tenant ID of the key vault
  tenantId: azure-tenantId
  # the subscription ID to use - this needs to be set explictly when using multi tenancy
  subscriptionId: azure-subscriptionId

node:
  besu:
    metrics:
      serviceMonitorEnabled: true
    resources:
      cpuLimit: 1
      cpuRequest: 0.1
      memLimit: "2G"
      memRequest: "1G"
Please set the aws, azure and cluster keys are as per the Provisioning step. quorumFlags.removeKeysOnDelete: true tells the chart to delete the node's keys when the chart is deleted. If you may wish to retain the keys on deletion, please set that value to false.
For the bootnodes only, set the quorumFlags.isBootnode: true. When using bootnodes you have to also set quorumFlags.usesBootnodes: true to indicate that all nodes on the network will use these bootnodes.
If you use bootnodes, you must set quorumFlags.usesBootnodes: true in the override values.yaml for every other node type, that is validators.yaml, txnode.yaml and reader.yaml
helm install bootnode-1 ./charts/besu-node --namespace besu --values ./values/bootnode.yml
helm install bootnode-2 ./charts/besu-node --namespace besu --values ./values/bootnode.yml
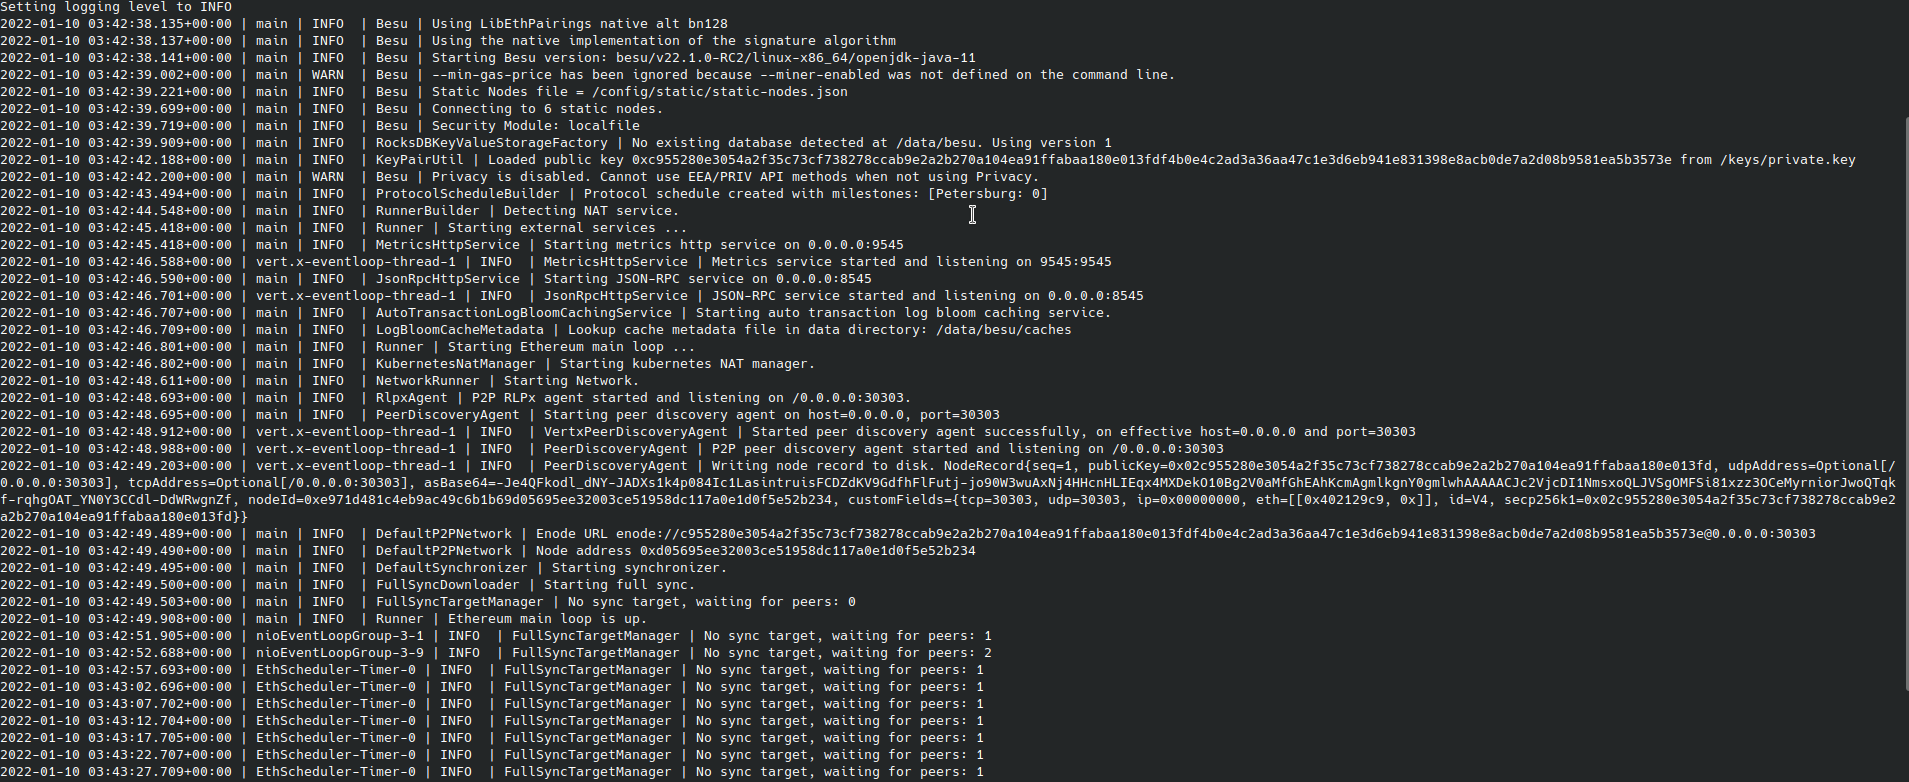
Once complete, you see two StatefulSets, and the two bootnodes discover themselves and peer. Because there are no validators present yet, there are no blocks created, as seen in the following logs.
6. Deploy the validators
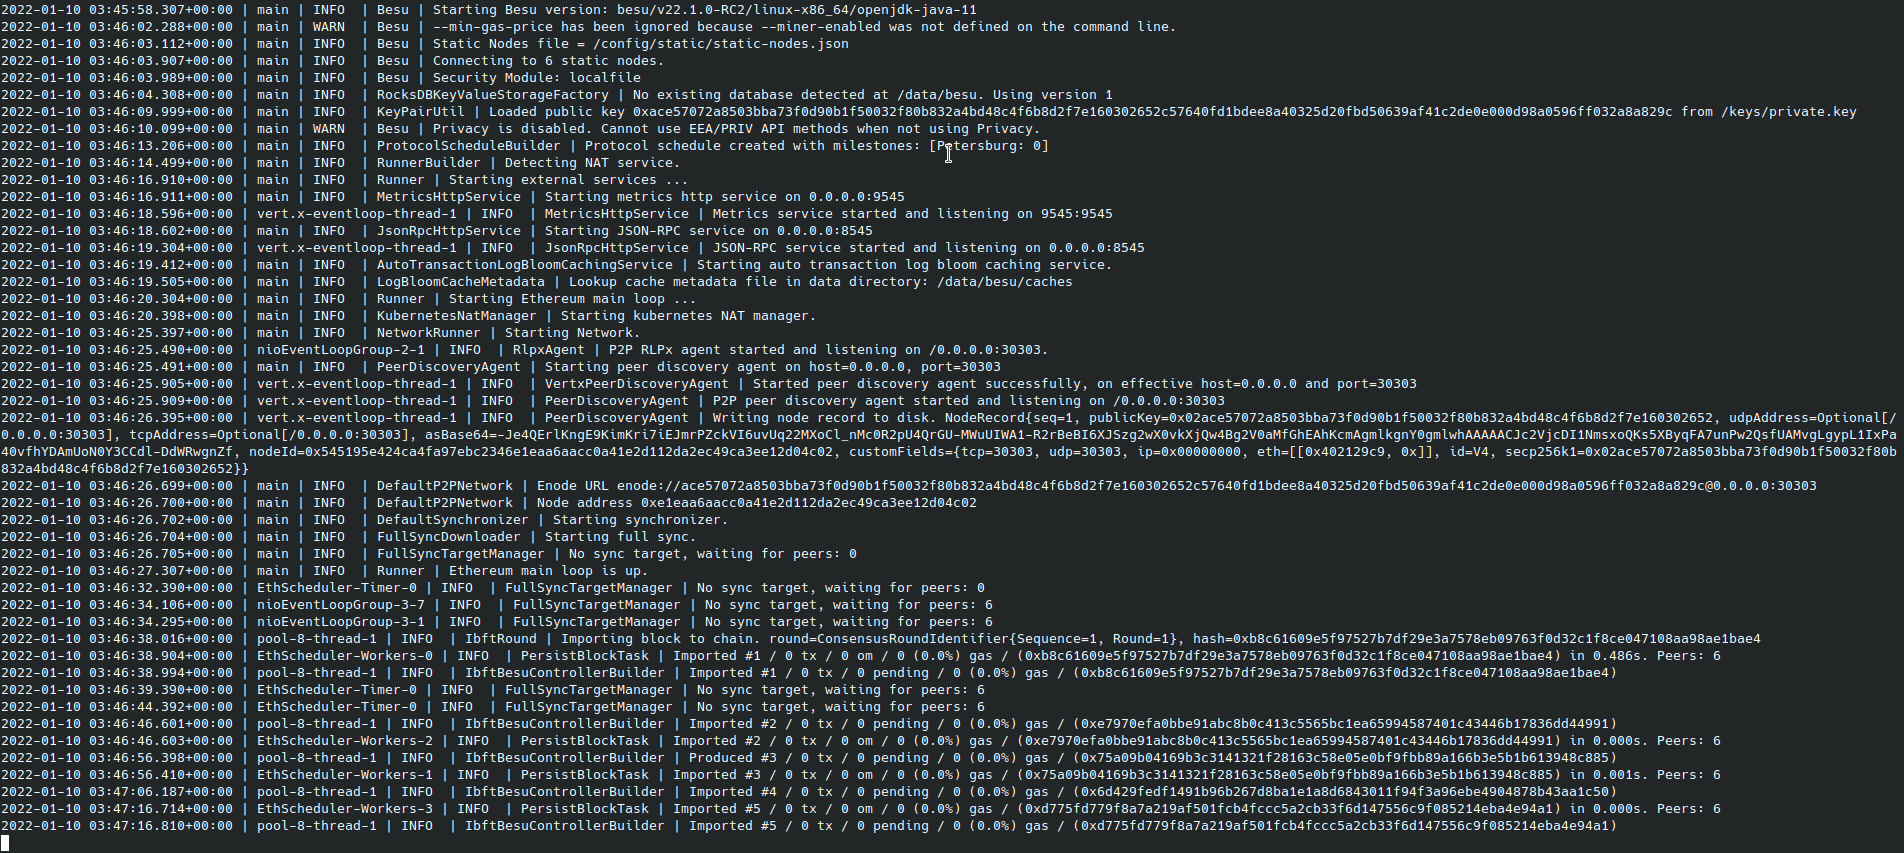
The validators peer with the bootnodes and themselves, and when a majority of the validators have peered, blocks are proposed and created on the chain.
These are the next set of nodes that we will deploy. The charts use four validators (default) to replicate best practices for a network. The override values.yml for the StatefulSet looks like below:
---
quorumFlags:
  privacy: false
  removeKeysOnDelete: false
  isBootnode: false   # set this to true if this node is a bootnode
  usesBootnodes: true # set this to true if the network you are connecting to use a bootnode/s that are deployed in the cluster
Please set the aws, azure and cluster keys are as per the Provisioning step. quorumFlags.removeKeysOnDelete: true tells the chart to delete the node's keys when the chart is deleted. If you may wish to retain the keys on deletion, please set that value to false.
Please note that if you delete a majority of the validators, the network will halt. Additionally, if the validator keys are deleted you may not be able to recover as you need a majority of the validators up to vote to add new validators into the pool
When using bootnodes (if deployed in the previous step) you have to also set quorumFlags.usesBootnodes: true to indicate that all nodes on the network will use these bootnodes.
For the initial validator pool we set all the node flags to false and then deploy.
helm install validator-1 ./charts/besu-node --namespace besu --values ./values/validator.yml
helm install validator-2 ./charts/besu-node --namespace besu --values ./values/validator.yml
helm install validator-3 ./charts/besu-node --namespace besu --values ./values/validator.yml
helm install validator-4 ./charts/besu-node --namespace besu --values ./values/validator.yml
It's important to keep the release names of the validators the same as it is tied to the keys that the genesis chart creates. So we use validator-1, validator-2, etc. in the following command.
Once completed, you may need to give the validators a few minutes to peer and for round changes, depending on when the first validator was spun up, before the logs display blocks being created.
7. Add/Remove additional validators to the validator pool
To add (or remove) more validators to the initial validator pool, you need to deploy a node such as an RPC node (step 8) and then vote that node in. The vote API call must be made on a majority of the existing pool and the new node will then become a validator.
Please refer to the Ingress Section for details on making the API calls from your local machine or equivalent.
8. Deploy RPC or Transaction nodes
An RPC node is simply a node that can be used to make public transactions or perform read heavy operations such as when connected to a chain explorer like BlockScout.
The RPC override values.yml for the StatefulSet looks identical to that of the validators above, and will create it's own node keys before the node starts.
To deploy an RPC node:
helm install rpc-1 ./charts/besu-node --namespace besu --values ./values/reader.yml
A Transaction or Member node in turn is one which has an accompanying Private Transaction Manager, such as Tessera; which allow you to make private transactions between nodes.
The Transaction override values.yml for the StatefulSet looks identical to that of the validators above and only has quorumFlags.privacy: true to indicate that it is deploying a pair of GoQuorum and Tessera nodes.
To deploy a Transaction or Member node:
helm install member-1 ./charts/besu-node --namespace besu --values ./values/txnode.yml
Logs for member-1 resemble the following for Tessera:

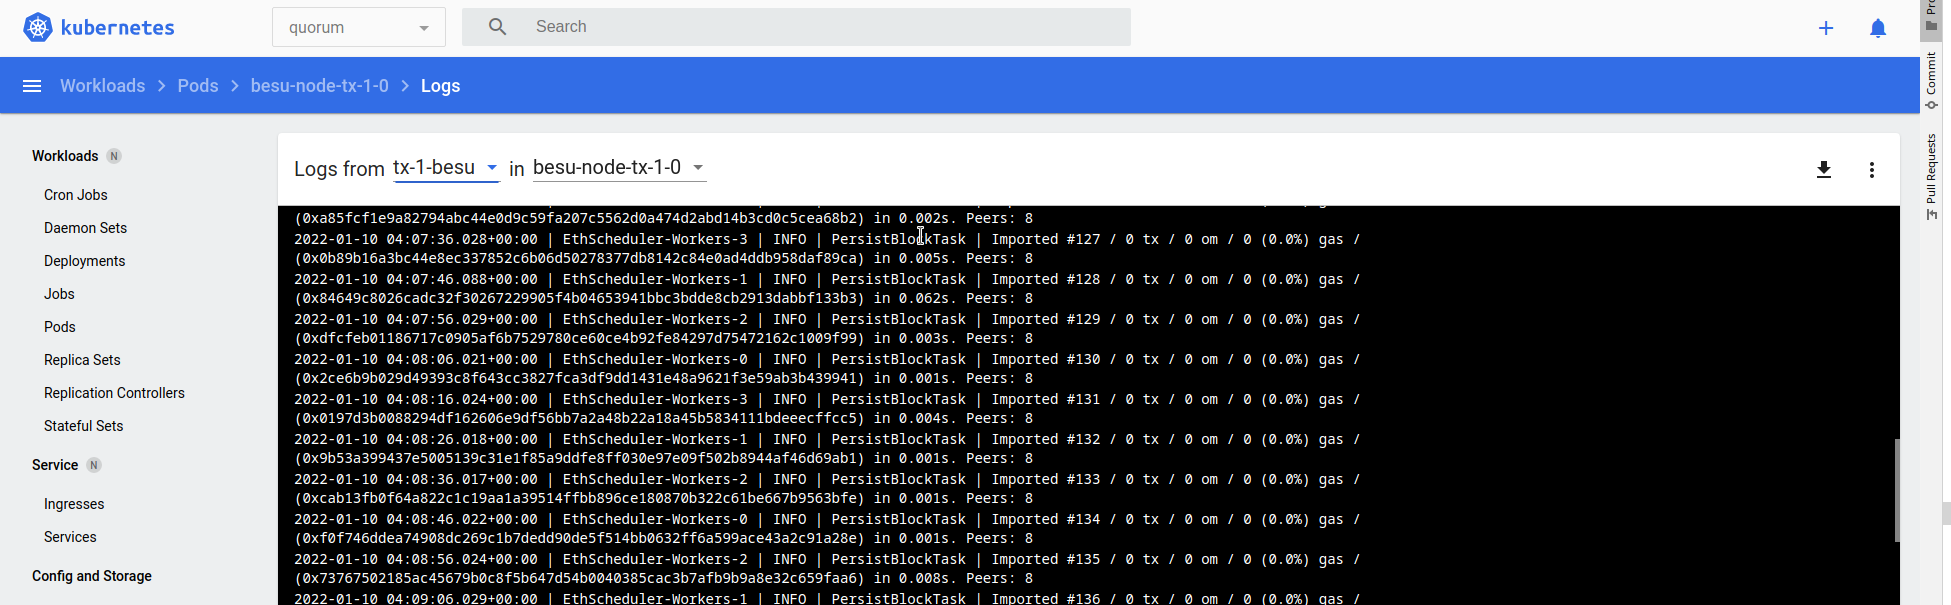
Logs for Besu resemble the following:
In these examples we use member-1 and rpc-1 as release names for the deployments. You can pick any release name that you'd like to use in place of those as per your requirements.
9. Connect to the node from your local machine via an ingress
In order to view the Grafana dashboards or connect to the nodes to make transactions from your local machine you can deploy an ingress controller with rules. We use the ingress-nginx ingress controller which can be deployed as follows:
helm repo add ingress-nginx https://kubernetes.github.io/ingress-nginx
helm repo update
helm install quorum-network-ingress ingress-nginx/ingress-nginx \
    --namespace quorum \
    --set controller.ingressClassResource.name="network-nginx" \
    --set controller.ingressClassResource.controllerValue="k8s.io/network-ingress-nginx" \
    --set controller.replicaCount=1 \
    --set controller.nodeSelector."kubernetes\.io/os"=linux \
    --set defaultBackend.nodeSelector."kubernetes\.io/os"=linux \
    --set controller.admissionWebhooks.patch.nodeSelector."kubernetes\.io/os"=linux \
    --set controller.service.externalTrafficPolicy=Local
Use pre-defined rules to test functionality, and alter to suit your requirements (for example, restrict access for API calls to trusted CIDR blocks).
Edit the rules file so that the service names match your release name. In the example, we deployed a transaction node with the release name member-1 so the corresponding service is called besu-node-member-1. Once you have settings that match your deployments, deploy the rules as follows:
kubectl apply -f ../ingress/ingress-rules-besu.yml
Once complete, view the IP address listed under the Ingress section if you're using the Kubernetes Dashboard or on the command line kubectl -n quorum get services quorum-network-ingress-ingress-nginx-controller.
The following is an example RPC call, which confirms that the node running the JSON-RPC service is syncing:
- curl HTTP request
- JSON result
curl -v -X POST -H "Content-Type: application/json" --data '{"jsonrpc":"2.0","method":"eth_blockNumber","params":[],"id":1}' http://<INGRESS_IP>/rpc
{
  "jsonrpc": "2.0",
  "id": 1,
  "result": "0x4e9"
}
10. Blockchain explorer
You can deploy BlockScout to aid with monitoring the blockchain. To do this, update the BlockScout values file and set the database and secret_key_base values.
Changes to the database requires changes to both the database and the blockscout dictionaries.
Once completed, deploy the chart using:
helm dependency update ./charts/blockscout
helm install blockscout ./charts/blockscout --namespace quorum --values ./values/blockscout-goquorum.yaml
You can optionally deploy the Quorum-Explorer as a lightweight blockchain explorer. The Quorum Explorer is not recommended for use in production and is intended for demonstration or Development purposes only. The Explorer can give an overview over the whole network, such as querying each node on the network for node or block information, voting (add/remove) validators from the network, demonstrating a SimpleStorage smart contract with privacy enabled, and sending transactions between wallets as you would do in MetaMask. Please see the Explorer page for details on how to use the application.
The accounts listed in the file below are for test purposes only and should not be used on a production network.
To deploy the application, update the Explorer values file with details of your nodes and endpoints and then deploy.
helm install quorum-explorer ./charts/explorer --namespace besu --values ./values/explorer-besu.yaml
You will also need deploy the ingress (if not already done in Monitoring to access the endpoint on http://<INGRESS_IP>/explorer
